Choosing The Right 240V Baseboard Thermostat requires checking compatibility, wiring, and load capacity. The table below summarizes five highly relevant thermostats that suit 240V electric baseboard systems, from simple manual controls to Wi‑Fi smart options.
| Product | Type | Key Feature |
|---|---|---|
| Cadet F Series Double Pole Built-In Thermostat | Built-In Mechanical | Integrated mount to Cadet heaters; 45–80°F range |
| Mysa Smart Thermostat For Electric Baseboards | Smart Wi‑Fi | App control, HomeKit/Alexa/Google, adaptive display |
| meross Smart Thermostat For Baseboards | Smart Wi‑Fi | HomeKit/Alexa/Google, supports 120–240V, 4‑wire required |
| Honeywell TL7235A1003 240V Digital Thermostat | Digital Non‑Programmable | On‑demand backlight, quiet TRIAC switching |
| YeloDeer 240V Manual Electric Thermostat | Manual Electronic | Compact dial design, 40–80°F control range |
Cadet F Series Double Pole Thermostat

This Cadet F Series thermostat is a double‑pole built‑in control designed specifically for Cadet F series electric baseboard heaters. The device operates across 120/208/240 volts and is rated at 22 amps. It features a straightforward twist dial with a temperature range of 45º–80ºF (7ºC–27ºC). Installation mounts directly to either end of a compatible Cadet heater, reducing the need for additional wiring runs. The thermostat is purpose‑built for Cadet F series heaters and is not presented as a universal retrofit for other brands or configurations.
Mysa Smart Thermostat For Electric Baseboards

The Mysa smart thermostat supports 120–240V high/line voltage electric baseboards and fan‑forced heaters. It requires a minimum of four wires in the wall box (including neutral or a second live) and supports loads up to 3800W at 240V. Key features include a free mobile app for remote control, integration with HomeKit, Alexa, and Google Home, programmable schedules for energy savings, and adaptive display/brightness technology. The product listing includes an important compatibility warning: it is not suitable for low‑voltage systems or older two‑wire installations.
meross Smart Thermostat 240V

The meross smart thermostat is engineered for high‑voltage electric baseboards, supporting both 120V and 240V systems with a maximum output load specified as 3840W at 240V. It requires four or more wires in the electrical box and offers smart integrations with Apple Home, Alexa, Google Home, and SmartThings. The listing notes an estimated install time under 30 minutes for compatible setups. As with other smart high‑voltage thermostats, confirm wiring type and load requirements before installation.
Honeywell TL7235A1003 240V Digital

The Honeywell TL7235A1003 is a 240‑volt digital non‑programmable thermostat with electronic temperature control. It offers an on‑demand backlight for easy reading, a heating indicator to show when the element is energized, and sound‑reduced operation to cut mechanical clicking noise. As a non‑programmable digital control, it provides precise setpoint control without scheduling functions. The device is intended for electric baseboards and similar line‑voltage heating systems and uses electronic switching methods.
YeloDeer 240V Manual Thermostat
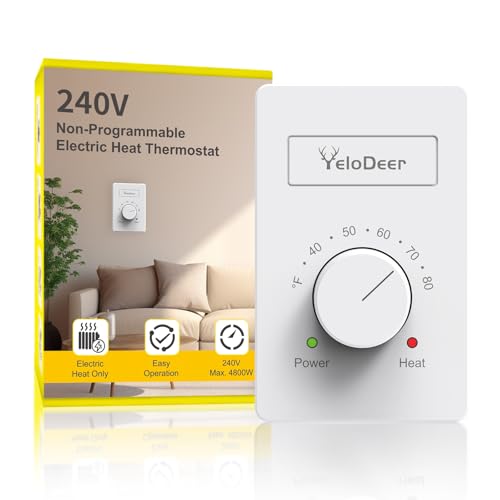
The YeloDeer product is a manual electronic thermostat rated for 240V systems and a maximum heating load up to 4800W. It provides a dial control with an extended temperature range of 40–80°F (4.4–26.7°C) and claims improved accuracy compared with traditional mechanical controls. The device is slim and intended to sit flush against the wall with a large knob for easy adjustment. Installation assumes standard line‑voltage wiring for baseboard heaters.
Buying Guide: How To Choose A 240V Baseboard Thermostat
Selecting a thermostat for a 240V baseboard heater involves several critical factors. Below are the primary considerations and comparison perspectives to help determine which style fits your installation and comfort goals.
Compatibility And Wiring
- Line Voltage vs Low Voltage: 240V baseboards are line‑voltage systems; they require thermostats rated for high voltage. Low‑voltage thermostats are not compatible.
- Wiring Type: Check whether your installation has 2‑wire (heat and neutral combined in older systems), or 3–4 wires with a neutral or second hot. Many smart thermostats require 4 wires (including neutral).
- Built‑In vs Wall‑Mounted: Some baseboard heaters accept a built‑in thermostat that mounts directly to the heater element (e.g., Cadet F Series). If your heater supports built‑in controls, verify model compatibility.
Load Rating And Electrical Capacity
- Amps and Watts: Ensure the thermostat’s amp rating matches or exceeds the heater’s current draw. For example, at 240V a 16A device supports up to 3840W; a 22A thermostat supports higher wattage.
- Multiple Circuits: If a heater draws more than a thermostat’s single‑pole rating, consider a double‑poledevice or split the load across circuits per local code and manufacturer recommendations.
Switching Technology And Noise
- Mechanical Relay / Bimetal: Traditional controls use mechanical relays or bimetal sensors. They are simple and robust but may produce clicking.
- Triac / Electronic Switching: Many digital and smart thermostats use triac switching for silent, precise control and smaller temperature swings. Digital devices often provide more consistent comfort.
Control Type: Manual, Digital, Or Smart
- Manual Thermostats: Dial or slider controls with straightforward operation and minimal wiring requirements. Good for basic installations and quick replacement.
- Digital Non‑Programmable: Provide accurate setpoints and electronic control without scheduling. Useful where silent operation and accuracy matter but remote control is not needed.
- Smart Thermostats: Offer remote control, scheduling, energy reports, and voice assistant integration. Smart units may require additional wires and a compatible electrical box. Confirm load limits and wiring before purchasing.
Installation And Mounting Considerations
- Box Space: Smart thermostats may require more wiring and room in the electrical box. Verify box depth and available conductors.
- DIY vs Professional Install: If you are unfamiliar with line‑voltage wiring, hire a licensed electrician. Line‑voltage work has safety and code implications.
- Built‑In Units: Built‑in controls typically mount to the heater and may eliminate wall boxes. Confirm model compatibility (e.g., Cadet F Series requires Cadet F heaters).
Features And User Experience
- Scheduling & Energy Savings: Smart thermostats can reduce energy use through schedules and geo‑fencing. Evaluate the estimated energy savings and feature set.
- Display & Feedback: Backlit or adaptive displays, heating indicators, and quiet operation can affect daily usability and user comfort.
- Integrations: If you use a smart home ecosystem, ensure the thermostat supports HomeKit, Alexa, Google Home, or SmartThings as needed.
Safety, Ratings, And Certifications
- UL/ETL Listings: Choose devices with recognized safety listings for line‑voltage heating equipment.
- Overload Protection: Ensure the thermostat specs match the heater’s wattage and that the circuit has appropriate breakers or fusing.
Comparison Perspectives
- Smart vs Manual: Smart models (Mysa, meross) excel in remote control, scheduling, and integrations. Manual or non‑programmable (Cadet built‑in, YeloDeer, Honeywell TL7235) may be preferable where simplicity, compatibility, or silent operation is prioritized.
- Built‑In vs In‑Wall: Built‑in thermostats streamline installation on compatible heaters. In‑wall thermostats provide a centralized wall control and a broader feature set when used with compatible wiring.
- Accuracy vs Complexity: Digital and electronic controls reduce temperature swing and improve accuracy; however, electronic controls can require different wiring and box space compared to mechanical thermostats.
Practical Steps Before Purchase
- Identify Heater Model: Check the heater label for voltage, wattage, and whether it accepts a built‑in thermostat.
- Verify Wiring: Open the thermostat/junction box (with power off) or consult documentation to confirm how many conductors are present.
- Match Ratings: Confirm the thermostat amp/watt rating meets or exceeds the heater’s requirements at 240V.
- Check Compatibility Notes: Read manufacturer compatibility warnings for smart thermostats—many do not support two‑wire or low‑voltage systems.
- Hire An Electrician If Unsure: When in doubt about wiring or code compliance, hire a licensed electrician for safe installation.
Maintenance And Troubleshooting Tips
- Periodic Checks: Inspect terminals for loose connections and verify the thermostat responds to setpoint changes.
- Noise Or Cycling: Excessive clicking or short cycling may indicate mismatch between thermostat type and heater or an overloaded control. Electronic switching usually reduces clicking.
- App Or Connectivity Issues: For smart units, ensure stable Wi‑Fi, adequate signal at the thermostat location, and that firmware is up to date.
Using the guidance above can help you select the most appropriate thermostat type—whether a built‑in mechanical Cadet control, a manual electronic YeloDeer, a digital Honeywell, or a smart option like Mysa or meross. Confirm wiring, load, and safety certifications to ensure correct and code‑compliant installation.